Showing posts with label Settings. iPhone. iPad.. Show all posts

14/01/2013

Setting up your iDevice Part 3

iCloud - iJoe Ultimate Guide

In my opinion the single greatest feature on your iDevice & the most incorrectly configured and under utilised.

This guide will not only help you set up your iCloud but will help you make the very most of it to ensure your iDevice is configured to work for you.

When you first access your iDevice you would of had the options to set up iCloud however for the purposes of this article we shall assist you in setting it up correctly at any point.

Firstly I'll explain the way it works. iCloud is a Cloud based service that stores your data in an encrypted and secure way Here. Its 99% private as Apple has the master key that if government asks for particular data about someone or something it can pass that data on. The best way to utilise iCloud and any cloud service is to put your data in the cloud to free up space else where. For instance I use a cloud music service that plays music on my iPad, this saves me from needing any music on my iPad an allows more space for or data.
iCloud also has other strings to its bow, that i shall cover further into this blog, but the premise is the same, storage in the cloud.

Set-up

Apple ID

First thing you need is an Apple id, I doubt you would of come this far to be reading an Apple blog without an Apple id. However the best way to get one is on your iDevice. Simply go into Settings / iTunes & App Store & Click Create a new Apple id. Follow instructions and BOOM your done.

ON

If you skipped your settings when first activating your iDevice go into settings and then iCloud and the instructions will be repeated. It will ask you if you wish to use iCloud, your answer is yes. It will ask you if you want to Back up to computer or back up to iCloud, make your choice after following the paragraph below.

Backup

With iCloud you can back up your device, and some or all of the contents to the iCloud. This is rather than backing the up to your computer. When backing up to a computer iTunes takes a full data copy of your device and settings and stores that on your computer hard drive. With iCloud not only is it configurable so you decide what data it copies to the cloud but also it doesn't have to take as much data as its taken from the device and not converted, with iTunes it needs to convert the data then convert it back when its sent back to your device.
Also you may only plug your device into iTunes once a week or longer so it takes a back up from that day. With iCloud it backs up at least once a day and you can manually trigger it to do it at any time. So if you lose or break your phone it should be as up to date as possible.

Then it will ask you if you want to use Find my iPad/iPod/iPhone, again make your choice after reading about it below.

Find my iDevice

If you choose to Find your device, you hopefully will never ever need to use it however when you do it could be the difference between you seeing your device again or not.
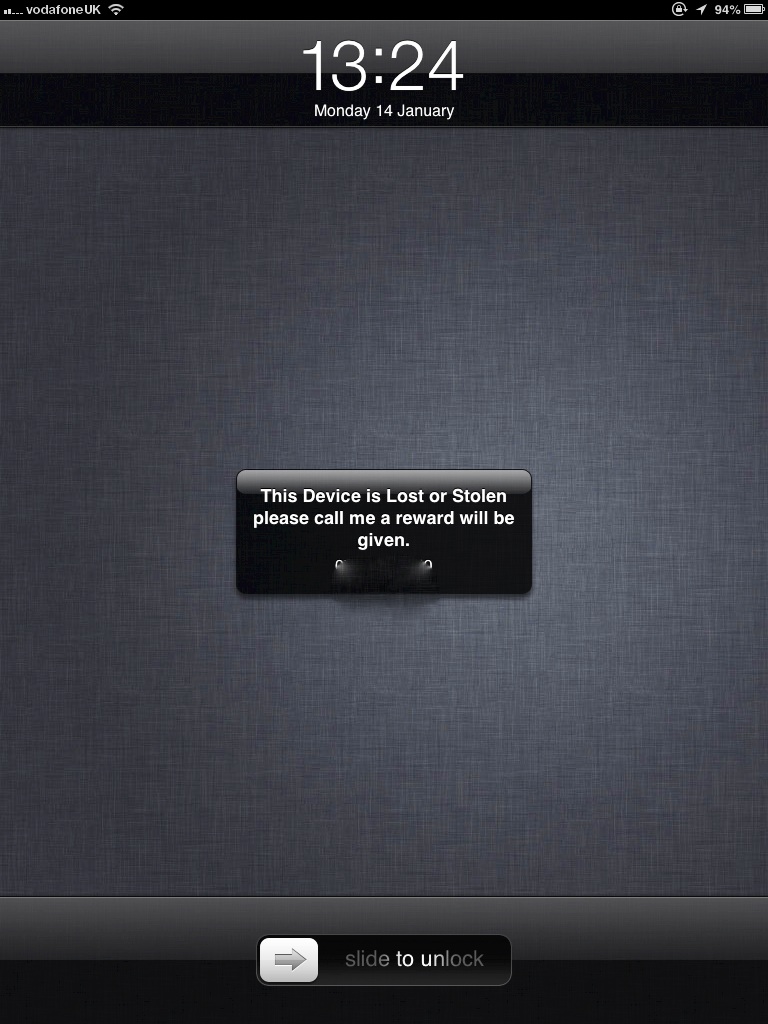
The way it works is the GPS inside your iDevice works to occasionally find your location for specific apps or system settings. If you lose your device you can use either a free app on another iDevice or go to iCloud.com and track your device. As long as your device is switched on, you can also use the same programs to Lock your device, wipe you device or say you've lost it in your house play a sound. Finally if you access iCloud.com you can also enter your device into lost mode which is a great feature. It allows you to enter a number and a message so you can alert someone that its lost and allow them to contact you with its location, I.E. in a pub or a bar. You can even offer an reward. 
Find my iPhone is worth its weight in gold and has been used to recover lots of devices and lock up the people who may of stolen them. Also recently some insurers are asking that this be utilised otherwise they will void your insurance.

Finally it will ask you if you wish to send diagnostics and usage data to Apple. Generally this is a good thing and nothing you should fear, however if your very sensitive about this you can turn it off at any time.

Once you've set up these options a vast amount of iCloud features begin to work "automagically" it starts backing up all sorts of data. If you go into Settings and iCloud you will be greeted by this screen, with everything on. I'll now explain what everything does, what you can switch off and what you can do.

Mail

When you signed up for your apple id you probably didn't know you got a iCloud email address. its likely some variation on your name followed by either @icloud.com or @me.com you can check by clicking into the account menu in the screen above and then "Advanced" mail. (Obviously my details are blurred out.) So if you use iCloud you can store you emails in the cloud. If you don't use your iCloud email address you can turn this off, however if you then use your iCloud address don't forget to turn it back on.

Contacts

No longer do you need to manually enter all your numbers into your next iPhone. If you store them in the cloud, when you enter your Apple id into the device it will instantly sync your contacts with the new device. Also it updates your contacts when you do so its up to the minute correct information.
If you use an external contacts manager such as Microsoft Outlook, Windows Contacts or another Contacts Cloud service you can turn this off. Even if you use other apps such as Buzz Contacts you still need this switched on as Buzz doesn't store your contacts on its app.

Calenders

This stores all your details from every calender you have on your iDevice and syncs it between your other iDevices, so you don't need to enter all the information manually, if you buy a new iDevice just like your contacts you will only need to enter your Apple id and iCloud does the rest.
Much like contacts if you use another Calender service such as Google Calender, Outlook or Yahoo you can switch this off or if you don't use the calender app you can also disable it.

Reminders

Much like your calender details this stores and syncs all your reminders, so when you have a new iDevice you will never forget to feed the fish. If you use an external reminder service or don't use this app at all then you can disable this.

Safari

This is used to improve your browser experience. If you use Safari on your computer and your iDevice you can sync all your bookmarks and also view something on your computer that you were reading on your iDevice. If you don't use Safari on either device or computer this won't be needed.

Notes

Much like the above it synchronises your notes allowing you to read them on any device or web page. If you use another note service such as Evernote, you can switch this off. 

Photo Stream

Two options here, you can have your own personal Photo stream so that anything you take with your iDevice camera will also show up on any other iDevice and your computer. You can also allow people to share photos with you by allowing a shared photo stream, so say you wish to send a photo of your cat to your friend, all you need is there email and it will be sent via photo stream. A slight variation that I use this feature for is I don't want every photo i take sent to my Computer or other iDevice so I share photos with myself allowing them to be available on both my iPad and iPhone. This also removes them from the Storage from my iDevice so therefore freeing up additional space.
Switch these off if you don't want to use them.

Documents and Data


If you use any app that stores documents for instance Pages by Apple. You need this switched on so you can store your documents in the cloud, so you can work on them on either iDevice or back on your computer without having to transfer them. Also this part saves such things as SMS and other phone data. Switch this off if you don't wish to use iCloud because this is essentially the crooks of the idea.

Find your iPhone/iPad

If for a fleeting moment whilst your breaking into Buckingham Places and you don't want anyone to know where you are you can turn this off. 

Storage & Backup

So as i detailed earlier you can both manually decide what to back up and also Back up manually. In the storage and back up sub menu you can manage both these things and your overall storage. You can also purchase storage if you need additional space.

Manage Storage

Because you signed up to Apple they decided to give you 5 GB of storage for free. If you have a lot of iDevices (More than 3) this will need to be managed, prior to possibly upgrading your storage plan.. Even if you only one device this is a great place to adjust your back up so you only back up the data you really need.

So click on the manage storage sub menu and your greeted with this. A brief breakdown of Your backups, your documents and data and your mail storage. Also at bottom of screen it give you a status bar of how much you have stored of your 5 GB. You can go into your backups to get further details. 

From there you can switch off anything you don't wish to back up its data. Now I have certain rules, yours might be different but I'll explain mine and you decide for yourself. So if any app stores data such as Camera+ stores photos on the app I will back it up. If it stores specific log in detail such as a Banking app will store your log in, i will back it up. I don't back up games as I'm not bothered if I've got to level 345 and when i transfer a device i need to play it again. Apps which log in information that are quite generic such as Facebook or twitter i don't store either.
Its up to you what you do, but remember you only have 5 GB and that won't last as long as you want it too.

You can also manually delete data from the documents and data screen, so as you can see here i have all these documents stored in Pages and i can delete them one by one. For other apps however you can't delete manually from this screen, camera+ for example you need to go into app and delete.

Change Storage Plan


If you've managed your storage and still are running out of room you can always upgrade your storage plan. Apple will obviously charge you for the privilege. Details are as follows.

Backup

So finally you can back up manually. Your iDevice will automatically back up When your Device is plugged in, locked and connected to WiFi  So usually over night unless your an insomniac. However if you want to make sure you can just click the back up now button and watch it happen.

Also if you don't want to back up you can switch it off here.

Summary

So that's every thing you need to know about iCloud. Its a great feature to look after your device data. A lot of features might seem pointless and not necessary but take it from experience when you need it because your device has broken or been lost its really the best thing, and the feeling that you read this article and didn't set up your iCloud will be not nice at all.

Any questions or queries contact me via usual places, links below. Or fire off a comment and I'll get back to you.

iJoe

Follow The Blog on Twitter : @iJoeBlog Like The Blog Page on Facebook : Like Email Me Email iJoe

02/01/2013

Setting up your iDevice Part 2

So in this part we will be going through the settings in the General, About & Siri Submenus.

ABOUT. (To Access - Settings, General, About)

Is not only a place to find specific information out about your iDevice but it's also features some small tweaks to really personalise your phone.

Name - Yes you can name your device, anything you want. This will show up every time you plug into iTunes, will show in your wifi devices etc etc. Go mad, let your imagination run free but please don't just call it (Your Name) (Your Device) because I can guarantee that there will be another Joe Bloggs who has an iPhone. NB. Yes my iPhone 5 is called SJ 5 after Steve Jobs.

The next few details are literally about your device, so Network, how many songs you have, and some important details such as imei and serial number. iJoe recommends you write your serial number down somewhere safe, you will need it if anything bad happens.

Finally at the bottom there are three submenus called Advertising. diagnostics and usage and legal.

Firstly the legal menu has all the legal notices that cover Apples back against your phone, if you want to read them all carry on.

The Diagnostics and usage menu is a place you can set if you wish to send usage data to Apple or not. The data it sends is far reaching and will mostly contain your location, so if your protective of this sort of thing I suggest you turn it to "Don't send".

Finally the advertising menu has a small choice for you to make. From all the D&U that Apple gets from the above it will then utilise its iAds in some of its apps to be specifically tailored to you and your location. If you won't want this to happen and for you to get just generic iAds turn it off.

GENERAL. (To access - Settings, General)

Some very important menus In here and things that can really help utilise your phone to its full capacity.

Software update - Every now and again Apple updates the software for your iDevice, to enhance some features or fix some bugs, you can update over wifi this way, if you just pop into this menu it will check if there is an update. iJoe recommends you update your device to the most available software.

Usage - Shows how much space is taken up on your device and a break down of what is using it. Does same for iCloud and cellular(mobile) usage. Also can choose to have a percentage displayed by your battery.

Siri - Any device after the iPhone 4S and iPad 3 is Siri compatible. If you don't know what Siri is its a mobile assistant that when you hold down the home button you can ask it to carry out certain tasks. (All likely tasks are shown in one of the images at the bottom.) Now personally I don't use Siri. It's not a complete enough product for me to get a benefit out of. Plus by turning Siri off you can save a hell of a lot of battery so it's up to u.

Cellular - (If your device is wifi only you won't have this.) This is the place to make sure you don't go rocketing over your mobile data allowance. You can set it up to disable or enable 3G, data roaming and what your device uses 3G for such as FaceTime, iTunes downloads etc etc. it's up to you with your download limits and how much of your day you sit in a wifi Zone.

VPN - This is a setting only someone who knows what a VPN is will utilise. If you have a VPN and want your iDevice to be a part of it you can configure it here.

iTunes wifi sync - Since iOS 5 you have been able to use an iDevice without directly needing a computer with iTunes, also you have been able to update and sync your phone via your computers wifi network, you device will do this automatically if your device and computer is on the same wifi, the device is locked and charging and you have selected the option in iTunes for you to wifi sync. Personally I feel this feature is poor, and isn't as reliable as it should be, it not only slows your wifi down it slows your computer and iTunes down because it needs so much CPU to work, iJoe recommends that if you sync a lot of data on or off your iDevice you plug your lightening or 30 Pin connector in. NB. Yes my computer is called Tim Cook.

Spotlight search - if you slide your menus to the right all the way your screen will shade out and a search bar will appear. If you search anything in there such as Cat, it will find everything in your phone that features cat, such as a SMS you might of sent and email, a contact called cat, an appointment about a cat. Literally anything related. If you don't want your phone to search all of this data, maybe take out messages or contacts you can change that in this menu.

Auto lock - A simple menu for you to decide how long your device will need to be inactive before it auto locks itself. The lower it is the better for your battery life and your security.

Pass code lock. - This is basically a pin for your phone. In this menu you can set it up, change how to use it, when its required and which applications can be used without it. One feature I would always make sure is put to NO unless you are a secret agent would be the Erase all data after 10 attempts. This will wipe your phone after 10 incorrect guesses. iJoe would recommend a pass code for your security.

Restrictions. - A very clever way to protect your device and bank account if someone else is using your device. If you enable restrictions you can stop certain tasks from happening such as in app purchases, deletion of apps. This feature really is useful if your children use your device.

Date and Time - Self explanatory. Should be set to set automatically, with your correct time zone below and your choice of 12 or 24 hour clock.

Keyboard - A great place to really personalise your phone, firstly the options.
Auto capitalisation - if on after a full stop the device will capitalise the first letter of next word. Like this.
Auto correction - If you make a common spelling mistake your device will correct it for you.
Check spelling'- Will check your spelling as you type and underline in red if its incorrect.
Enable caps lock - You can put device in caps lock by double tapping on the shift button.
"." Shortcut - If enabled will place a full stop every time you press space twice.

Keyboards - if you are able to communicate in another language then you can add additional keyboards via this menu and they will show up on every keyboard with a little globe symbol.

Shortcuts - you can add your own personal auto corrections, so if you find yourself always typing a word incorrectly you can put the incorrect way in as your short cut and the correct way as your phrase. Then every time you type it wrong the device will auto correct it. A great way I use these for is for form filling or information keeping, so I put my email addresses as the phrase and a quick shortcut to them so if I type gmail my email address pops up. iJoe really recommends this as a way to speed up how u use your device.

International - You can customise your device to what ever language you require.

Accessibility - Apple is The best at making devices everyone can use and in the accessibility options you can really tailor your device to be easier to use if you are hard of hearing, disabled, visually impaired, react better to light, see colours differently. There is a wealth of options for you to use no matter what, there are no barriers here.
Two features I will highlight is LED Flash for alerts is a setting a lot of people use, when you have a notification your flash on the back of the phone flashes, much like a blackberry. Also assistive touch, if really useful if you have an issue with your hands or your devices home button, when enabled it puts a software home button on the screen that allows you to use your phone as normal. It also shades out when not in use.

And finally, the place to go if something not right. RESET. In this menu you can reset your phone in many ways, all will involve some sort of data loss and change to your phone. I would only utilise these options as a last resort and after you have backed up your data to an external source.

So that's part two done. A lot of detail about pure settings of your phone to make it work efficiently and to its full capabilities.

If you have any questions or queries please email me or visit Facebook page and twitter account. Links at bottom of page.

Next time we will be going through Brightness Settings, wallpapers and iCloud.

iJoe

iJoe Follow The Blog on Twitter : @iJoeBlog Like The Blog Page on Facebook : Like Email Me Email iJoe


27/12/2012

Setting up your iDevice - Part 1

Congratulations you have a new iPhone, iPad, iPad mini or iPod touch, in this blog post I'm going to help you through the things that you need to do to set up your new device.

After you have set your phone up out the box you'd be mistaken to think that is all, wrong, pop open the settings App on your device and start to customise it to be your way.

NOTIFICATIONS - How your phone and its apps alert you.

These are a real issue for some people and you need to configure it right for you so it alerts you in the right way, but not too much and becomes invasive.

So when you open your notification settings you'll see a list of apps with details of how they alert you it can be really quite confusing hopefully the following will help.

Some people Don't even use the notification centre or know it exists. To view it swipe your finger from the top of your screen and it appears.

DO NOT DISTURB.

To access it Click into settings/notifications/do not disturb. As it explains "When Do Not Disturb is enabled calls and alerts that arrive while locked will be silenced, and a moon icon will appear in the status bar." You can enable it at any time in the settings app, but you can also configure it to come on and switch off at any time in particular, such as the times you are asleep. You can also set it up to allow certain calls from particular contacts, also if the same contact rings you within three minutes it will not be silenced.

This is a really useful feature and can stop you being woken or disturbed during a meeting or appointment. I suggest you utilise it
NOTIFICATION CENTRE / Not In NOTIFICATION CENTRE.

Below the Do Not Disturb settings are individual settings for each app. Firstly you can configure in what order they are displayed either manually or By Time of the notification.

Then you can set up the individual apps by clicking on the app, then it opens a new menu with the following.

Notification Centre (On/Off) - If it's On it will show in the Notification Centre, if its Off you can still be alerted but it won't be stored in the Notification Centre.

Show - (1, 5 or 10 items). So if its an App you get lots of notifications in short space of time it would be more useful for it to be set higher. Note - If the notification centre setting is off, the show option will be removed.

Alert Style - (None, Banners, or Alerts).
If its set to none you will not receive a on screen alert.
If its set to Banners, you will receive a small banner spin down from the status bar, and then go away after a short time.
If its set to Alerts an Alert will appear that you will need to complete an action for it to be removed.

Badge Icon - (On/Off)
If its set to On you'll have a small red icon on the top right of the App icon.
If its set to Off you won't.

Sounds - (On/Off)
View In Lock screen - (On/Off)

Personally i have lots of apps set up to show as a banner or just a badge icon and lots of apps I don't wish to be notified by, however it's a massive personal choice.

Next Time. About, Siri, Sounds & Wallpaper.

iJoe

Follow The Blog on Twitter : @iJoeBlog Like The Blog Page on Facebook : Like